
Installation Instructions for the SNX Rotary Joint

Effective: April 4, 2025

Introduction

Read all of the instructions before proceeding.

Refer to Kadant Johnson assembly drawing for part identification and to drawing A37640 for torque specifications. For easy identification, parts used in individual steps are often accompanied with their position in the assembly drawing [e.g. gasket (8B)]. Tighten all fasteners in a star pattern. Certified drawings are available upon request. Dimensions are for reference only and subject to change.

Safety

warning symbol

This safety symbol alerts you to risk of death or injury if the instructions are not followed. In all steps, death or injury may result if the machine is not de-energized, depressurized, cooled, and stopped. Death or injury may occur if the product is operated with a fluid type or at a pressure, temperature, or speed that does not meet its specifications. Death or injury may occur if heavy parts and pinch hazards are not handled properly. Follow your company’s safety procedures.

Step 1

Remove the existing equipment. If installing a new journal flange, install with a new gasket.

symbol

Equipment must be cool and free of pressure.

Step 2

Remove the head (2), packing gland (10N), locknut (30), packing rings (36) and packing (35) from the rotary joint.

Important: Check that the horizontal pipe is straight and true to prevent excess wear and breakage.

Step 3

Slide the nipple flange (5) over the rotary joint nipple (4) with the taper facing out. Place the split wedges (55) into the recess of the nipple. Slide the nipple flange over the wedges.

Step 4

Place metal gasket (8Q) into the journal flange. Lift the rotary joint up, slide over the horizontal pipe and into the journal flange. Secure to studs with nuts. An even gap of 1/8" to 3/16" (3 to 5 mm) should remain in between the journal flange and nipple flange.

Note: If the rotary joint had a threaded nipple connection, thread it into the journal flange and tighten.

Step 5

Reinstall the packing, packing gland, and locknut. Apply approximately 30 ft-lbs. (41 Nm) of torque to the gland and tighten the locknut.

Step 6

Reattach the head (2) and gasket (8).

Step 7

Connect piping to rotary joint using Kadant Johnson flexible metal hose.

Important: Refer to "Flexible Hose Installation"

Recommended Minimum Hose Lengths
Hose Size Minimum Length
1/4" 8" (200 mm)
3/8" 10" (250 mm)
1/2" 10" (250 mm)
3/4" 12" (300 mm)
1" 15" (380 mm)
1-1/4" 18" (450 mm)
1-1/2" 18" (450 mm)
2" 21" (530 mm)
2-1/2" 22" (560 mm)
3" 24" (610 mm)

Step 8

Install anti-rotation device.

Important: Refer to "Anti-rotation Rod Installation"

Recommended Sizes for Anti-Rotation Rods
Rotary Joint Size Rotary Joint Number Schedule 80 Pipe Size Rod Diameter
3/4" 3200 1/8" 10 mm
1" 3300 1/8" 10 mm
1-1/4" 3400 1/4" 12 mm
1-1/2" 3500 3/8" 16 mm
2" 3550 1/2" 20 mm
2-1/2" 3600 1/2" 20 mm
3" 3700 3/4" 25 mm

Measuring Seal Ring Wear

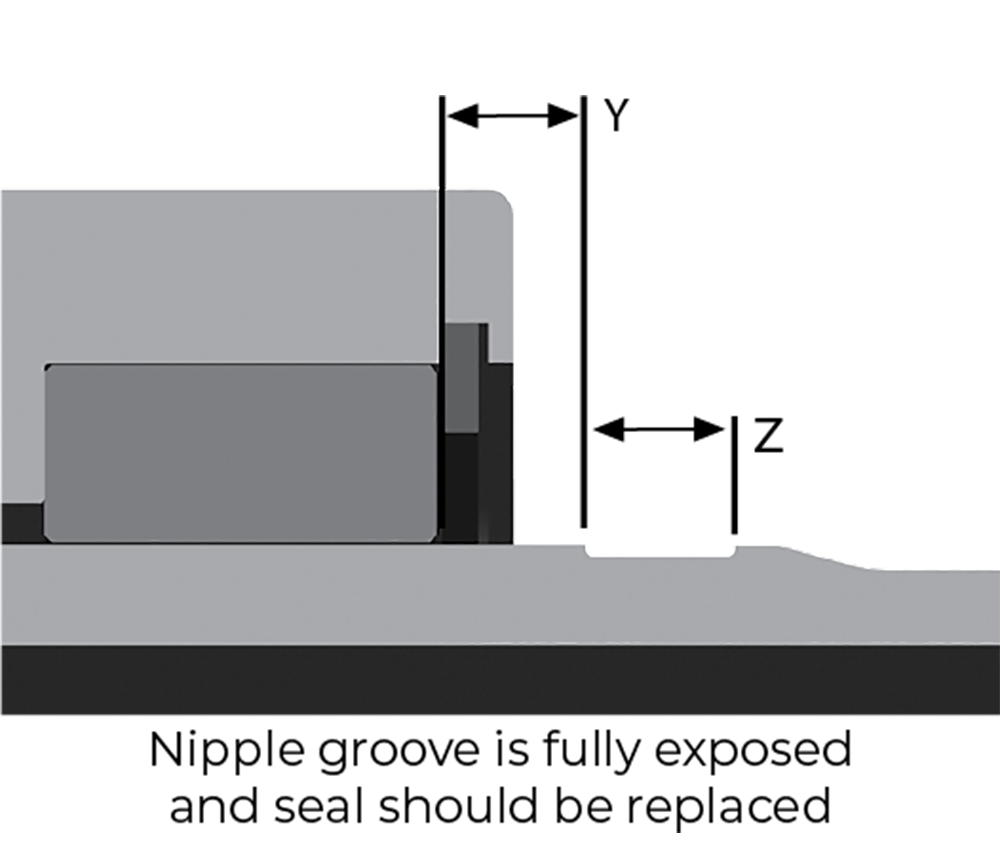
Measure the width (Z) of the groove in the nipple. Measure the distance between the dry guide and the edge of the groove (Y). When they are equal (Z = Y) the seal ring is worn and should be replaced. Ring wear may be also be measured using the “X” dimension. Refer to “Measuring Seal Ring Wear.”

IS-SNX

The Kadant Johnson Warranty
Kadant Johnson products are built to a high standard of quality. Performance is what you desire: that is what we provide. Kadant Johnson products are warranted against defects in materials and workmanship for a period of one year after the date of shipment. It is expressly understood and agreed that the limit of Kadant Johnson’s liability shall, at Kadant Johnson’s sole option, be the repair or resupply of a like quantity of non-defective product.

Kadant Johnson rotary joints and accessories could be subject to European Pressure Equipment Directive 2014/68/EU (PED). Modifications or changes to rotary joints and/or accessories are only permitted upon approval of Kadant Johnson. Only genuine Kadant parts and original accessories will ensure the safety of these assemblies. The use of other than original parts voids the warranty and will lead to forfeiture of the declaration of conformity and will invalidate any liability for damages cause thereby.